ArcGIS text files
Introduction
Some data, such as Points of Interest and OS MasterMap®Topography Layer Building Height Attribute, are provided as text files and do not contain feature geometries (Points of Interest contains eastings and northings which can be used to locate the features).
When loading these in to ArcGIS it is necessary to create a definition file named schema.ini that specifies the delimiter used in the text file and the data type of each field. This schema.ini definition file ensures that ArcGIS handles the file correctly.
Without schema.ini files ArcGIS will automatically assign data types for each field in the file which may not be correct, for example ArcGIS may decide that a date/time field is actually a text field which would prevent any date/time query operations from being run.
Preparing the data
Before you can load data from a text file in to ArcGIS you must first create a file called schema.ini in the same directory as the text file you wish to import.
The rules for defining schema.ini files are well documented on the Microsoft Developer Network (MSDN); the basic structure of a schema.ini file is as follows.
{filename}
- Format=format
- ColNameHeader=headerrow
- Col1=fieldname1 datatype
- Col2=fieldname2 datatype
- Col3=fieldname3 datatype
- ColX=fieldnamex datatype
The bold items above should be replaced as described below:
- filename - this should be replaced with the filename of the text file that you are importing e.g.buildingheights.csv
- format - this is used to tell ArcGIS the delimiter used between fields in the file, available options for are: TabDelimited, CSVDelimited, Delimited(custom character) e.g. Delimited(“) for a file that uses quotations marks as a delimiter, and FixedLength.
- headerrow - enter True if your file has a header row,False if your file does not
- fieldname1, fieldname2, fieldname3 etc. - these should be replaced with the names of the fields you wish to see in ArcGIS, e.g.FeatureID,Area,Name.
- datatype - these should be replaced with the data type that is appropriate for each field, the most common data types are:Text,Long (i.e. a whole number),Double (i.e. a decimal number), and DateTime. A full list of valid data types can be found on MSDN.
So, if we have a comma separated text file called example.csv which contains a header row and has three fields for FeatureID (whole number), Area (decimal number) and Name (free text) the schema.ini file would look as follows:
example.csv
- Format=CSVDelimited
- ColNameHeader=True
- Col1=FeatureID Long
- Col2=Area Double
- Col3=Name Text
Note: the schema.ini file must be saved in the same folder as the text file that it refers to.
If you wish to load more than one text file from a single folder then you can add multiple definition blocks to a single schema.ini file as you cannot have two files called schema.ini in the same folder.
Download schema.ini Files
Standard schema.ini files created by EDINA for use with the data products downloaded through Digimap are available using the links below:
| OS Product | Download |
| OS MasterMap®Topography Layer Building Height Attribute | bha_schema.ini |
| Points of Interest | poi_schema.ini |
The Points of Interest schema.ini file above is designed to work with Points of Interest data downloaded from Digimap with all columns of data. If you have chosen a subset of columns then you will need to modify this file to ensure it matches the data you have downloaded.
Adding the data to ArcGIS
Having created the schema.ini file and saved it in the same folder as the text file you wish to import, the next step is to add it to ArcGIS using the standard Add Data function. This will add the data as a table in your map document which can be opened by right clicking on it in the table of contents.
Having added the data to your map document it is worth checking that the data types specified in the schema.ini definition file have been correctly used. This is done by right clicking on the file in the table of contents and selecting Properties from the popup menu, then clicking on the Fields tab:
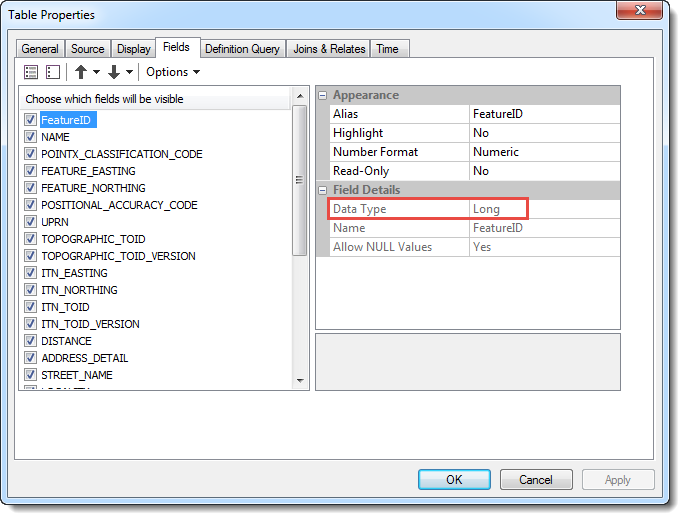
The field names are shown on the left hand side, and the data type which should have been read from the schema.ini file of the field highlighted on the left are shown in the section highlighted on the right hand side in the image above.
Using the data for analysis
Having added the data to ArcGIS you could join it to another dataset using the GIS JOIN operation if the two datasets have a common field.
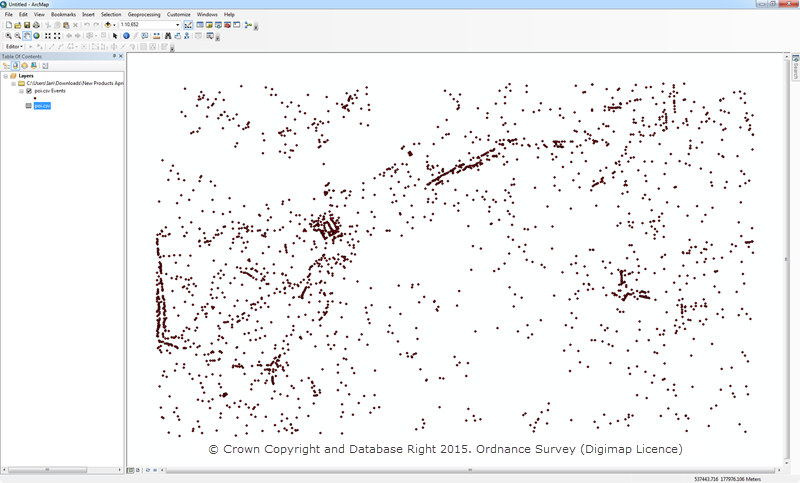
If the data contains eastings and northings, such as the Points of Interest data you can plot the data as a series of points in your map document.
Step 1
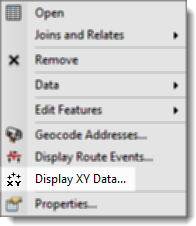
This is achieved by right clicking on the dataset in the table of contents and selecting ‘Display XY Data…’:
Step 2
This will bring up the ‘Display XY Data’ window where you can select the fields that contain the easting and northing values:

Note: it is also good practice to specify the coordinate system of the data to ensure it is located in the correct position.
Step 3
When you press the OK button the data will be displayed in the map window:
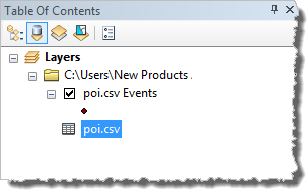
There will be two entries in the Table of Contents, one for the original text file (poi.csv), the other is a spatial layer with the word ‘Events’ after the filename:
Step 4
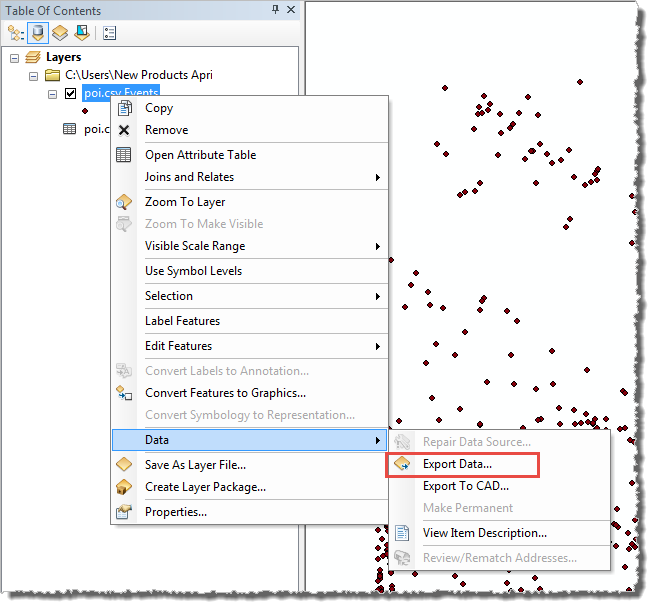
You can do basic analysis using this ‘Events’ layer, but if you wish to access the full range of GIS functionality then you need to convert it in to a full spatial dataset (e.g a shapefile or geodatabase feature class). This is done by right clicking on the Events layer and selecting Data, Export Data… from the popup menu:
Step 5
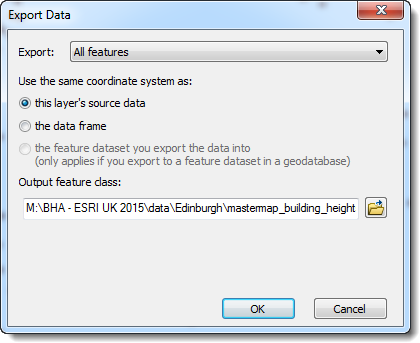
In the Export Data window specify the features you wish to import (all features or just those in the current view), the coordinate system and the output location:
Step 6
You will be prompted to add the newly exported dataset to the map.
Further Information
Further information on schema.ini files can be found on the Microsoft Developer Network.